Hontech HT8040/HT9040/HT9042
Problem:
- Device fly-away while running M2860.
- Device pick up error on SITE 3, HEAD 2 of Index Arm 1.
- H03-HT84 trips whenever the power is powered up.
- Auto tray unloader#1 unable to open tray seperator during tray elevation.
- I/P arm unable to open/close pickup arm during running.
- Step Driver Board (M16) fuse blown.
- Input Arm Z1 & Z2 unable to HOME.
- Index Arm 1 unble to move.
- Intermittent device pickup error at Arm#2 Head#5.
- Input Shuttle misalign with Index Arm.
- MTrayZ motor torque error.
- H13-HT84 24v circuit breaker tripped.
- Info on BGA scanning on handlers.
- Encountered torque error "MTest Z1 - Motor out of torque Error".
- VM issue (Bent Lead, pin 1).
- Input Shuttle 2 for H13-HT84 unable to heat up.
Date: 11/16/05
Problem:
Input Shuttle 2 for H13-HT84 unable to heat up.
Troubleshooting route & Solution:
- Check circuit breaker for heater, OK.
- Check connection on Input Shuttle, found flex cable was broken.
Broken cable on Input Shuttle
- Cable was changed by Vendor.
Conclusion
Broken cable causing shuttle unable to heat up.
Remarks
N/A.
Done by:
- Lim Chang Fei (PM Group)
- Vendor (Hontech)

Date: 08/17/05
Problem:
VM issue (Bent Lead, pin 1).
Troubleshooting route:
- Since it is a 4-site handler, isolate first, which site contributes problem.
- With sites 1 and 3 turned on, ran 1 tray and do VM, 7 units fail bent lead (defect pin1, at the top of dot).
- Switch to sites 2 and 4, ran 1 tray and do VM,100% passed VM.
- To check whether both sites 1 and 3 having problem, ran 1 site at a time. Confirmed both were giving problem.
- Change socket and ran 1 tray, still fail and while doing this.
- Visually inspect the device every after test and learnt that bent leads only occur at head 5 and 7.
- Change nest, still fail.
Solution:
- Rotated 90° the upper nest plate (preciser) 1 and 3, ran 1 tray of device, 100% passed.
- Double confirm, ran the devices again and do VM, still 100%.
Conclusion
Nest upper plate (or called preciser) causing VM issue.
Remarks
During set-up of this device, if encountered VM issued the socket plate can oriented to 90 deg so that the device pins will be too close or touching the inner edge of the socket plate.
Done by:
Bong Choon Siong (D-Shift Shift Leader, Line Engineer)
Date: 04/21/05
Problem:
Encountered torque error "MTest Z1 - Motor out of torque Error".
Troubleshooting route & Solution:
- Shutdown the handler and try to home, same.
- Notice that the motor servo driver board (M9) shown error.
- Swop the motor driver servo board (M9) with (M10), same error shown on (M10) motor servo driver.
- Take a motor servo driver board (M10) from another handler.
- After changing the servo board no more torque error encountered.
Conclusion
Faulty servo driver board causes torque error.
Done by:
Lee Kim Hock (D-Shift Associate Engineer, Test Manufacturing Associate Engineer)
Date: 02/04/05
Problem: Info on BGA scanning on handlers.
Information:
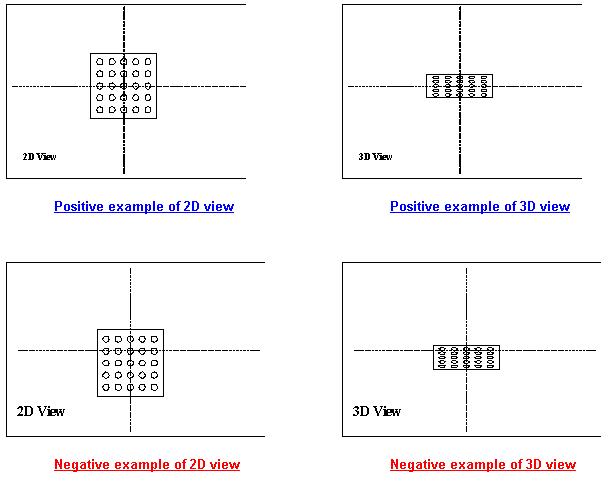
- Left click on the mouse on the scanner display screen (Right side) for the 2D view.
- Right click on the mouse on the scanner display screen (Right side) for the 3D view.
- Try to achieve the image as near as possible to the center of the reference line by changing the value in the
X, Y & Z offset position of output arm at the scanner light head during scanning.
Done by:
Ang Wee Meng (Equipment Group, Test Equipment Engineer)
Date: 01/22/05
Problem: H13-HT84 24v circuit breaker tripped.
Troubleshooting route:
- Turn on circuit breaker, tripped immediately.
- Power down handler, turn on circuit breaker.
- Power up handler, circuit breaker tripped immediately.
- Remove all cooling fan because all cooling fan using 24v power supply, circuit breaker still tripped upon power up.
- Measure continuity of circuit breaker connection from A1 to B1, it's shorted.
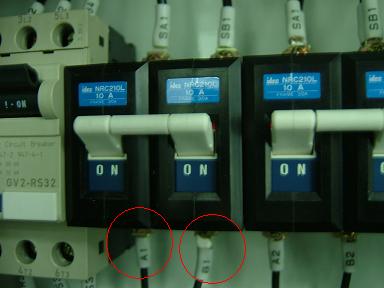
24v circuit breaker
- Compare with another known good handler, B1 is shorted to ground but A1 is not. A1 to B1 is not shorted.
Solution:
- Time taken to look for bad/expose connection that short A1 to ground & causing A1 shorted to B1.
- Found Input Arm flex cable is rubbing against a screw which is grounded.
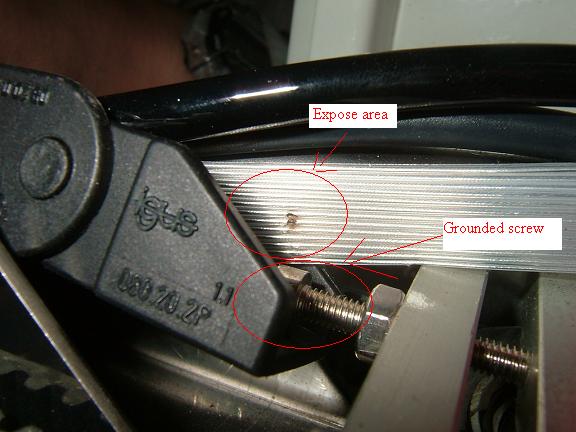
Exposed cable
- Temporary insert a piece of paper to insulate the cable from touching the ground screw.
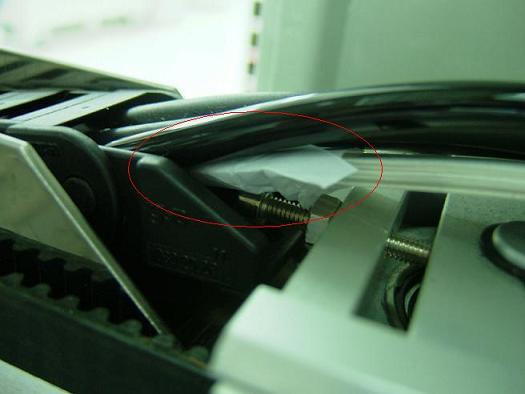
Paper to insulate cable
- Power up handler & 24v circuit breaker, no more trip.
- Cycle using Offline & Dummy Mode for 20 minutes, OK.
- Release to production.
Conclusion:
Input Arm flex cable rubbing on screw for some time causing cable's insulator worn & short cable to ground.
Remarks:
N/A.
Done by:
Lim Chang Fei (PM Group)
Teo Yew Tiong, David (PM Group)
Prevention:
1. 2 screws was used to tighten the cable holder to the metal chassis so that during the y-axis movement of the arm
assembly, the flex cable will still be holding to the chassis thus minimisng any physical rubbing bewtween the cable
and the belt tension screw.
2. Sponge had been used to cover those part of the cable that was having higher chances of physical contact with the handler metal parts.
3. Vendor will be sourcing for right angle cover to cover the 90° portion.
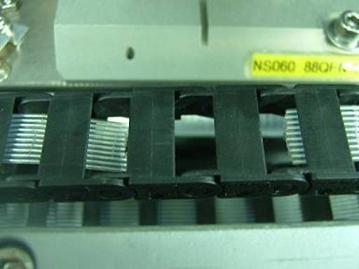
Flex cable
Done by:
Ang Wee meng (Equipment Group, Test Equipment Engineer)
Date: 01/16/05
Problem: MTrayZ motor torque error.
Troubleshooting route:
- Tried to restart windows, same.
- Perform full handler shutdown and powercycled again, same.
Solution:
- Found loose sensor wire connection, H01 z position.
- Re-connected the sensor wire, H01, OK.
Conclusion:
Loose sensor causing the torque error.
Remarks:
N/A.
Done by:
Lee Hwee Seng (B-Shift, Test Manufacturing Associate Engineer).
Date: 01/03/05
Problem: Input Shuttle misalign with Index Arm.
Troubleshooting route:
- HOME the handler, problem still exist.
- Shutdown the handler, problem still exist.
- HOME the handler and check the motor driver board, no error shown.
- HOME the handler again and found that one of the Input Shuttle home sensor is not cut off properly.
Solution:
- Adjust the home sensor switch and try to HOME again.
- Input Shuttle able to home properly but unit placement is slightly out.
- Reteach units placement.
- Try 1 tray of unit, no problem encountered.
Conclusion:
HOME sensor not cut off properly causing Input Shuttle misaligned.
Remarks:
N/A.
Done by:
Bong Choon Siong (D-Shift Shift Leader, Test Manufacturing Senior Associate Engineer).
Date: 12/28/04
Problem: Intermittent device pickup error at Arm#2 Head#5.
Troubleshooting route & solution:
- Swapped workpress and monitor, same.
- Check vacuum, present but weak.
- Dismentled the contact assembly and check, noticed the air tube nozzle was not fully thightened to the assembly.
- Thightened the nozzle and monitor during production.
- No more pickup error encounter.
Conclusion:
Air nozzle not fully thightened .
Remarks:
N/A.
Done by:
Tan Kiam Heong (A-Shift Shift Leader, Test Manufacturing Senior Associate Engineer).
Date: 12/27/04
Problem: Index Arm 1 unble to move.
Troubleshooting route & solution:
- Power down & up handler, same.
- Check stepper motor condition, OK.
- However, observe that set screw securing timing belt with stepper motor is loose.
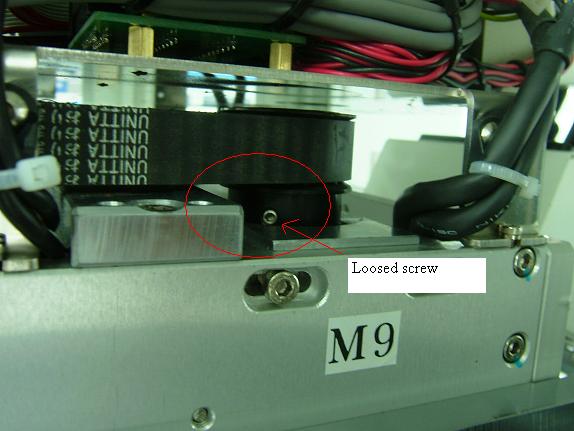
Loosed screw
- Tighten the screw. HOME handler, OK.
- Run Offline Dummy Mode, OK.
- Release to production.
Conclusion:
Loose set screw causing Index Arm unable to move.
Remarks:
N/A.
Done by:
Ermeno Mata Lazaga (Equipment Group, Test Equipment Senior Associate Engineer).
Date: 12/27/04
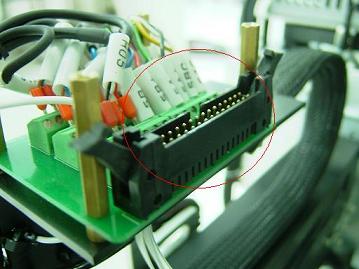
Problem: Input Arm Z1 & Z2 unable to HOME.
Troubleshooting route:
- Check motor torque, no torque. Hence not power supplied to motor.
- Swap Micro-Step Driver M4 with another handler, same. Return back Micro-Step Driver to original position.
- Measure DC voltage on 4B- to 4B+, no voltage.
- Measure DC voltage on 13B- to 13B+, approx. 3V measured.
- Suspect white cable on Input Arm causing the 0V on 4B.
- Remove white cable on Output Arm to simulate, no reading on 13B.
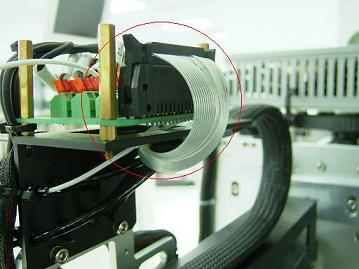
White Cable
- Hence, white cable might causing 0V on Input Arm.
- Plug back white cable on Output Arm.
- Continue troubleshoot on white cable, suspect cable broken internally.
- Time taken to trace the cable to find physical broken cable, no abnormallity.
Solution:
- Comparing cable connection at front of handler with another good handler.
- Surprisingly found a connector connection is different with the good handler.
- Correct the wrong connection, torque Input Arm Motor Z1 & Z2 is OK.
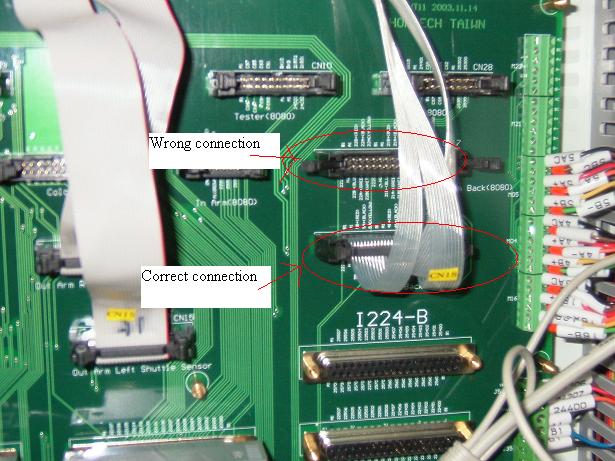
Correct connection
- Voltage on 4B & 5B is OK.
- HOME handler, OK.
- Perform Offline Dummy cycle, OK.
- Release back handler to production.
Conclusion:
Wrong cable connection causing no voltage supply to Input Arm Motor Z1 & Z2.
Remarks:
- Cause of this incidence might due to line careless during troubleshooting.
- Might due to vendor careless during comparing or checking connection.
Done by:
Lim Chang Fei (PM Group)
Ang Wee Meng (Equipment Group, Test Equipment Engineer)
Date: 12/20/04
Problem: Step Driver Board (M16) fuse blown.
Troubleshooting route & Solution:
- Get assist from Hontech vendor.
- Problem most likely cause by cable short during movement.
- Remove cable and clean connector to ensure no particles causing electric short.
- Check cable for broken insulator.
Affected cable & connector
Conclusion:
Fuse blown cause by cable internally short.
Remarks:
Monitor handler for 1 day(24 hours), no fuse blown encountered.
Done by: Vendor.
Date: 12/19/04
Problem: I/P arm unable to open/close pickup arm during running.
Troubleshooting route:
- Tried to "home" the handler, but I/P arm(M16) not moving.
- Move arm manually, movement very smooth.
- Confirmed not mechanical problem.
- However, the arm was able to move smoothly even when the panel power is on.
- Checked incoming power for the I/P arm motor(M16), noticed no incoming 24V DC.
- Proceed to check incoming power at the step driver board(M16/TD-2M24), found fuse(F1) blown.
Solution:
- Get spare from offline handler(H04-HT84) and checked for 24V supply, OK.
- Tried to "home" handler, no problem.
- Monitor production for 30 mins, no problem encountered. Endorsed back to MFG.
Conclusion:
Fuse(F1) blown.
Remarks:
N/A.
Done by: Tan Kiam Heong (A-Shift Shift Leader, Test Manufacturing Senior Associate Engineer).
Date: 12/19/04
Problem: Auto tray unloader#1 unable to open tray seperator during tray elevation.
Troubleshooting route:
- Checked surrounding sensors and compare with other handler, OK.
- Checked seperator functionality using I/O mode,OK.
- Adjust seperator open/close speed but still same.
- Perform handler "homing" and restart handler software,the same problem still exists.
Solution:
- Shutdown, powercycle the handler and monitor, OK.
Conclusion:
Suspect handler software problem.
Remarks:
N/A.
Done by: Tan Kiam Heong (A-Shift Shift Leader, Test Manufacturing Senior Associate Engineer).
Date: 12/05/04
Problem: H03-HT84 trips whenever the power is powered up.
Troubleshooting route:
- 24VDC breaker trips whenever the power is powered up.
- Suspect is the Fans causing the trip.
Solution:
- Power down handler and Disable ALL the fan connections in the handler.
- Power up handler, no trip.
- Connect the fan connection One at a time.
- Power trips when the back fan near the testhead area is connected.
- Disable that fan and enable the rest of the fan, no trip occurred.
Conclusion:
Back fan faulty causing handler power to trip.
Remarks:
N/A.
Done by: Chua Gee Wee, Raymond (C-Shift Shift Leader, Test Manufacturing Senior Associate Engineer).
Date: 11/16/04
Problem: Device pick up error on SITE 3, HEAD 2 of Index Arm 1.
Troubleshooting route:
Problem 1: Device pick up error on SITE 3/ HEAD 2 of Index Arm 1.
Action:
- Reduce pick up height on Arm 1, still intermittent error.
- Swop nest, still intermittent error.
- Swop contactor, still intermittent error.
- Swop Shuttle 2 to Shuttle 1, still intermittent error.
- Check tubing that links from the valve to the Index Arm 1 contactor.
- Discovered that the whole bundle of tubing was bent.
- And its cause by the friction between the Arm and the metal fitting when the Arm moves.
- Initial grey tape that binds all the tubing together was worn out.
- Tape all the tubing together with a red tape.
- Resume production, but still have intermittent error.
Problem 2: Device pick up error again.
Action:
- Check onto the bundle of cable.
- Discovered that 1 of the tube is broken.
- Use a tube fitting to connect the broken tube together.
- Tape all the tubings together again & resume production.
Conclusion:
Broken tube causing vacuum leakage. Hence, pick-up error occurred intermittent.
Remarks:
Vendor has repaired the handler including changing the air tube and flexi cable for index arm#1 and also
replaced the heating element for I/P shuttle#2. Currently running fine, no major jamming encountered.
Done by: Chua Gee Wee, Raymond (C-Shift Shift Leader, Test Manufacturing Senior Associate Engineer).
Date: 05/05/04
Problem: Device fly-away while running M2860.
Troubleshooting route:
- The units was "missing" on the output shuttle when it "came" out from the index arm location.
- After checking the handler, found that the purging for the 4 index arm was too strong and the released height
of units from index arm on output shuttle was too low.
Solution:
- Lower the air purging and the release height around yesterday evening time. Had checked with the last night
line shift leader and so far did not encountered any "fly away" units.
Conclusion:
Optimise air purging & release height to prevent unit from flying off.
Remarks:
N/A.
Done by: Ang Wee Meng (Equipment Group, Test Equipment Engineer).